Sunday 31 July 2011

Palmiers


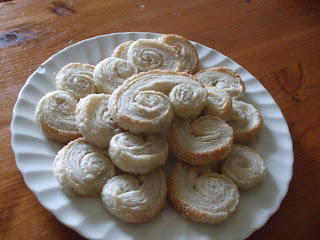
I had these when I went to Majorca when I was about 10 and I couldn’t, for the life of me, remember what they were called.  Until I came across a picture of some.  And lo and behold!  I decided to make some myself.  I’ve only made these once (and I forgot to sprinkle sugar over them before putting them in the oven, hence why only the edges are brown and the rest of them look anaemic) but they tasted so good I think I’ll have to add them to my regulars.

Onto the recipe!
Ingredients:
·         Puff pastry
·         Sugar (I used granulated.  Not sure how well it would work with other types but it wouldn’t hurt to try!)

Heat oven to 200oC (400oF).  Sprinkle some sugar over your worktop (as you would do with flour, etc) and roll out the puff pastry until it is about a ¼ - ½ inch in thickness.  Sprinkle roughly the same amount of sugar over the top of the dough (you could add cinnamon, or some flavouring of some sort if you wanted).

Roll one of the longer sides inward until it hits the middle of the dough.  Do the same for the other side.  Both sides should meet and touch in the middle.  Let it chill for 30 mins in the fridge to firm it up, so that it is easier to cut.

After taking it out of the fridge, start cutting off slices that are about a ¼ - ½ inch thick.  If you don’t want anaemic palmiers like me, then sprinkle sugar onto both sides of the palmiers.  Press the sides of the rolls together so that they stay together whilst baking and place the palmiers onto baking trays lined in greaseproof paper.

Bake for 10-15 minutes or until they turn a nice, golden brown colour.  Cool on a wire rack before serving.
Saturday 30 July 2011

Strawberry Cake


I adore this cake!  I have yet to experiment with different fruits but, when I do, I will be sure to post the results.

Ingredients:
·         80g unsalted butter (or 40g butter and 40g vegetable shortening.  Again, the texture isn’t as smooth but the taste is the same), room temperature, plus extra for greasing.
·         185g plain (all-purpose) flour
·         1½ tsp baking powder
·         ½ salt
·         200g granulated sugar (plus, optional, 2 tbsp for sprinkling over the top of the cake)
·         1 medium egg
·         115ml milk
·         1tsp vanilla extract
·         400g strawberries, hulled and halved

Preheat oven to 175oC (350oF).  Grease a 10-inch (springform, if you have one) cake pan (works with a 9-inch pan, too).

Whisk the flour, baking powder and salt together in a bowl.  In another bowl beat the butter and 200g of sugar until pale and fluffy (quicker using an electric mixer).  Mix in the egg, milk and the vanilla extract until combined.  Add the flour mixture in batches until smooth.

Pour the batter into the cake pan.  Assemble the strawberries, cut side down, on top of the batter, placing them as close together as possible.  (If you choose to, sprinkle the 2tbsp of sugar on top for a nice caramely finish.

Bake for 10 minutes at 175oF, then lower the temperature to 160oC (320oF) and bake until a skewer comes out clean (45-50 minutes).  Cool cake on a wire rack before serving.

The first time I made this cake I didn’t sprinkle sugar over the top, so the strawberries sunk into the cake a bit more:


When I made the cake again, I decided to try sprinkling sugar over the top and this was the result:


It tastes exactly the same (in my opinion) either way but I think it looks better with the sugar layer on top.  It tastes really good drizzled in double cream, too!

Friday 29 July 2011

Red Velvet Whoopie Pies

Let’s start off this blog with something that has started to become quite popular over here in the UK.  Red Velvet and Whoopie Pies!


I made these the other day (please ignore the random red bits that have mixed with the icing.  I couldn’t get rid of them.  Also, I’ve lost my camera so the photos have been taken on my phone.  Sad face).  And I love them!  And, apparently, so do my brother’s friends, to whom my brother nicked most of the whoopie pies to take to his band practice.  But oh well!  At least people like them.  Which is always a good thing.
     Anyway!  The recipe:

Ingredients:
Whoopie Pies:
·         120g butter at room temperature (or you could use 60g butter and 60g vegetable shortening – I use Cooken.  This won’t give as smooth a texture but it will taste the same)
·         175g light brown sugar (using dark brown sugar doesn’t make a difference)
·         1 medium egg (free range!)
·         290g plain (all-purpose) flour
·         1 tsp salt
·         1½ tsp bicarbonate of soda
·         240ml buttermilk (or 240ml milk and 1½ tsp lemon juice)
·         25g cocoa powder
·         1 tsp red food colouring
Filling:
·         50g cream cheese (I use Philadelphia.  To me, it’s the best!)
·         30g unsalted butter at room temperature
·         ½ tsp vanilla extract
·         220g icing sugar
Optional:
·         Red edible glitter (if you have it) to sprinkle over the top of them.  It totally baffled my brother’s friends when they saw that they were eating ‘sparkly’ cakes.

Set oven to 180oC (350oF).  Line two baking tray with greaseproof paper.

Whisk together the butter and the sugar (either by hand or in an electric mixer).  In another bowl, mix the flour, salt and baking powder together.  And in yet another bowl, mix the cocoa powder with the food colouring.

Whisk in the egg into the butter and sugar until it is completely combined.  Then add the flour mixture in parts, varying between the flour mixture and the buttermilk.  When all the flour and buttermilk has been added, mix in the red cocoa powder mixture.

Put the batter into a piping bag and pipe 5cm circles onto the lined baking trays.

Bake them for 10-15 mins (or until they spring back when touched).  Leave them to cool on a wire rack before filling them (otherwise the filling will melt!)

To make the icing, beat the cream cheese and butter (again, either by hand or in an electric mixer) before adding the vanilla extract and the icing sugar.  Keep beating until it becomes smooth and fluffy.  Pipe onto the flat side of one of the pies and sandwich with another pie (flat sides facing each other).  Do this for all the pies.  If using the edible glitter, just sprinkle it over the pies (you don’t need much to make them look good.  Although the glitter hasn’t shown up in any of my pictures.  Again, sad face)


The nom nom nom would be more impressive if I had found my camera :(